Using the Workup API With Zapier
Overview
Zapier is an automation platform that allows you to create workflows that integrate multiple systems such as email, CRM and finance systems. Automations can be triggered based on a event such as a new lead or started manually. Zapier now also supports a set of AI capabilities.
Workup can be utilised in a Zapier workflow by using the Workup API. We do not have an official Zapier connector yet but you can use Zapier webhooks to either fetch data from Workup or update data, such as updating tasks or employee data
Configuring a Webhook
You can create a workflow (called a zap) using their designer. You can add a step to a workflow and select a component to add to a Workflow. You should choose the Webhooks component. This then adds a Webhook to the workflow that you can then configure. A Webhook will generally call a REST API endpoint using a URL and will either be a GET (read) operation or a POST (create/update) operation.
Zapier provides a dialog allowing you to configure a webhook component. You first choose the operation as either GET or POST. The next step allows you to enter a URL and your API Key and any parameters. The third step allows you to test the webhook. Details on configuring a GET and a POST webhook are below.
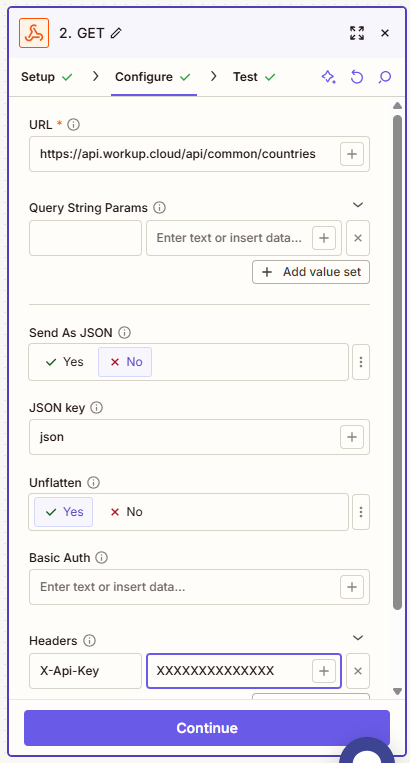
Reading Data from Workup using GET
To read data from Workup you use a GET operation and enter the appropriate URL. The webhook can return one or more records which can then be processed within Zapier. An example configuration for a GET operation is shown below. You should obtain the right URL from the Swagger or Scalar documentation, for example https://api.workup.cloud/api/common/countries, which returns the list of countries supported in Workup. You also need to add your API Key as a header record using the header key X-Api-Key
Sending Data to Workup using POST
To send data to Workup to create or update a record you need to use a POST operation. Creates, updates and deletes are all performed using a POST operation to the Workup API. The configuration is slightly more complicated for a POST. You need to enter the correct URL, eg https://api.workup.cloud/api/scheduler/projecttask/create (to create a new project task) and enter a valid API key as a header with the header key X-Api-Key.
You also need to enter the field names and values that you want to send to Workup. On a Create operation you will need to include all mandatory fields or the operation will fail. On an UPdate operation you will need to provide the id for the record you want to update (eg projectTaskId) as well as the values for any fields you want to update. You only need to provide values for fields you want to update, the existing data will be retained for any fields you do not pass. An example is shown below:
